
Demystifying Code Signing in macOS: A Step-by-Step Tutorial for CLI Applications with CMake
The purpose of this blog is to help web developers to jump into systems programming. So you can ask any question; there are no dummy questions. I want this blog to be a discussion space for every programmer on this journey.
As a developer creating macOS applications, ensuring the security and integrity of your software is crucial. Code signing is an essential practice that helps you achieve this goal. Furthermore, Apple requires apps to be signed with a certificate issued by them before they can be submitted to the App Store or integrate app services.
In this blog post, we'll explore the concept of code signing in detail and guide you through signing a macOS CLI application using CMake. Whether you're a beginner or an experienced developer, this tutorial will provide valuable insights into securing your macOS applications.
At the end of this blog, you'll be able to:
- ✍️ Understand how code-sign works
- 💻 Code sign your macOS application with CMake
- 👀 Verify that your application is signed properly
Let's start with a bit of theory!
What is code signing?
Code signing is a technique that prevents accidental or malicious code modification. In other terms, it will guarantee the authenticity of your application.
📃Code signing your app assures users that it's from a known source and hasn't been modified since it was last signed. Before your app can integrate app services, be installed on a device, or be submitted to the App Store, it must be signed with a certificate ("Developer Id" or "Apple Development").
Source: https://developer.apple.com/support/code-signing/
Let's see how code-sign works in detail.
Code sign workflow
Once your application is finished you cannot upload your application to the store like this once your application is finished. You have to code-sign it!
- First, the content of the executable will be passed to a hash algorithm and produced as a one-way hash.
- This hash will be encrypted with the private key: this is the signature
- The signature is stored in the binary, belonging to the certificate that will contain the public key
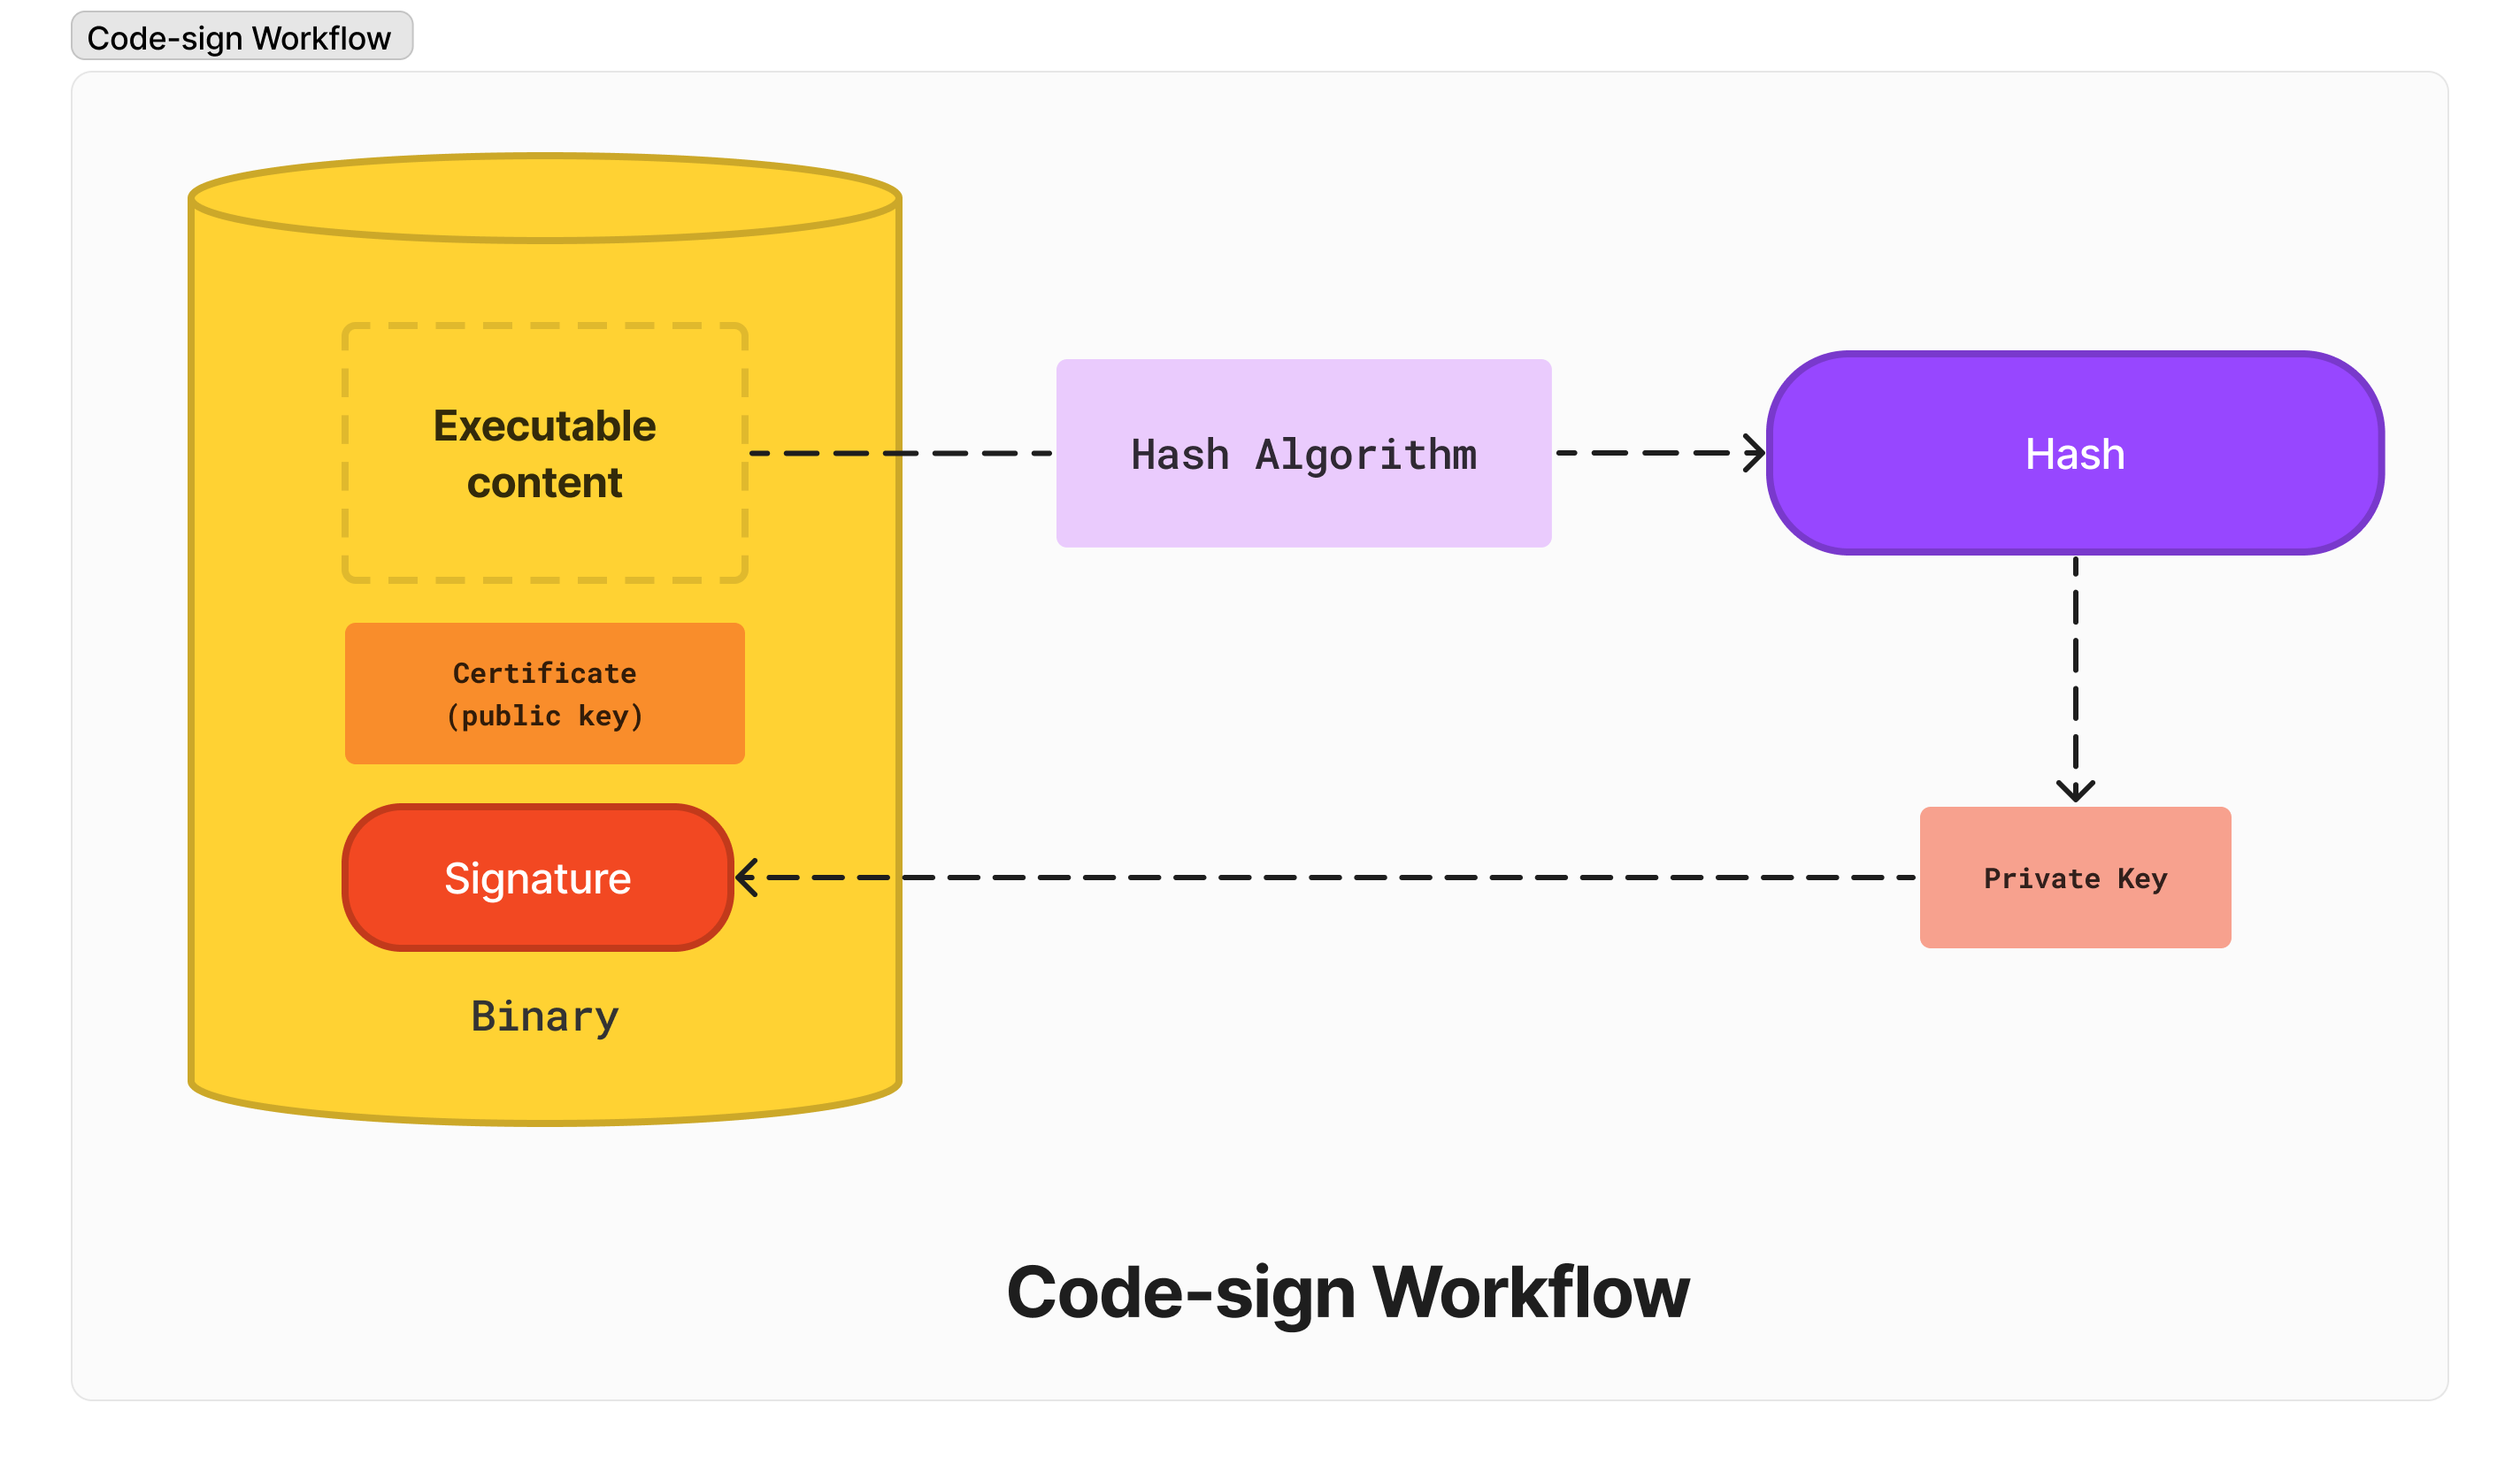
Your application is now signed!
"Okay, but what happens when the user opens the application?"
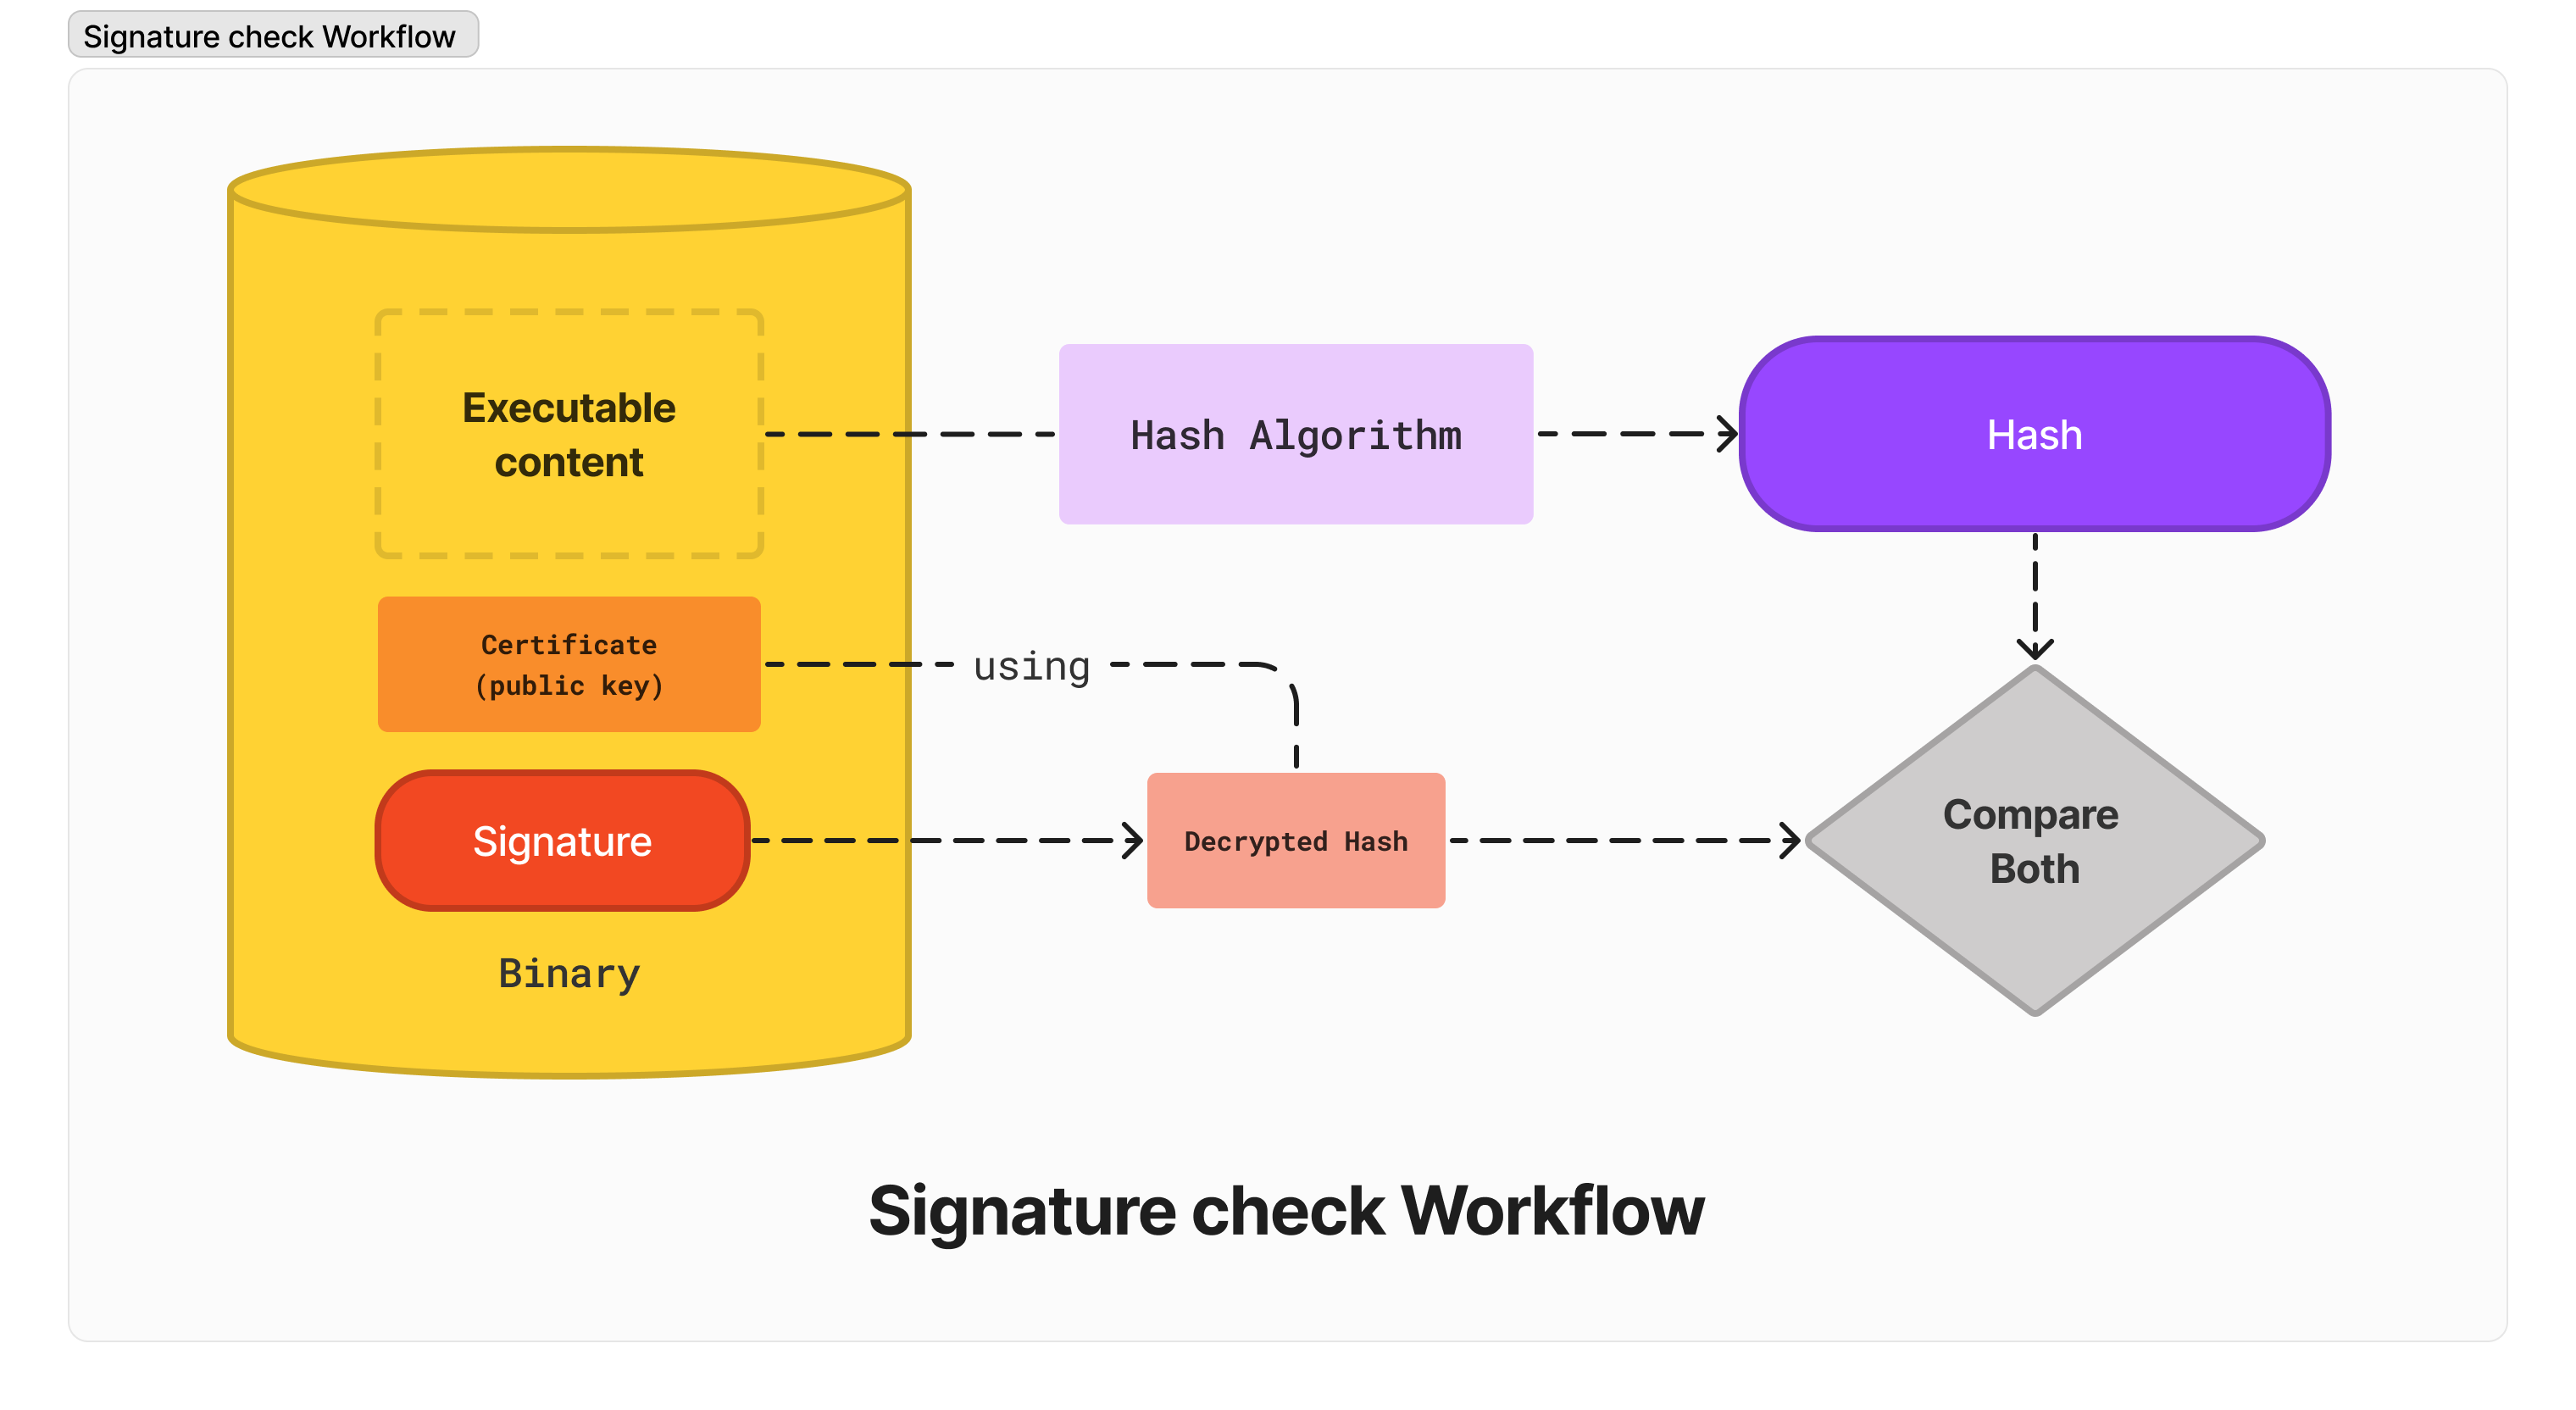
Signature check Workflow
The Gatekeeper will check the signature:
- The content of the executable will be passed to a hash algorithm and produce a one-way hash (again)
- The public key will be used to decrypt the signature, and the decrypted value points to the initial hash (step 2 of the code-sign workflow)
- Both hashes will be compared. If they match, then the code signature verification is successful. Otherwise, it fails.
Now that we have a general idea about code signing, let's build a basic macOS application!
Build a basic macOS CLI application
Before all, you need either:
- A proper "Developer ID Application" certificate was delivered by Apple. This certificate guarantees your identity, and Apple acts as Certificate Authority (they will charge you for this).
- A self-generated "Apple Development" certificate
You can create a certificate from Xcode by visiting the "Settings" window:
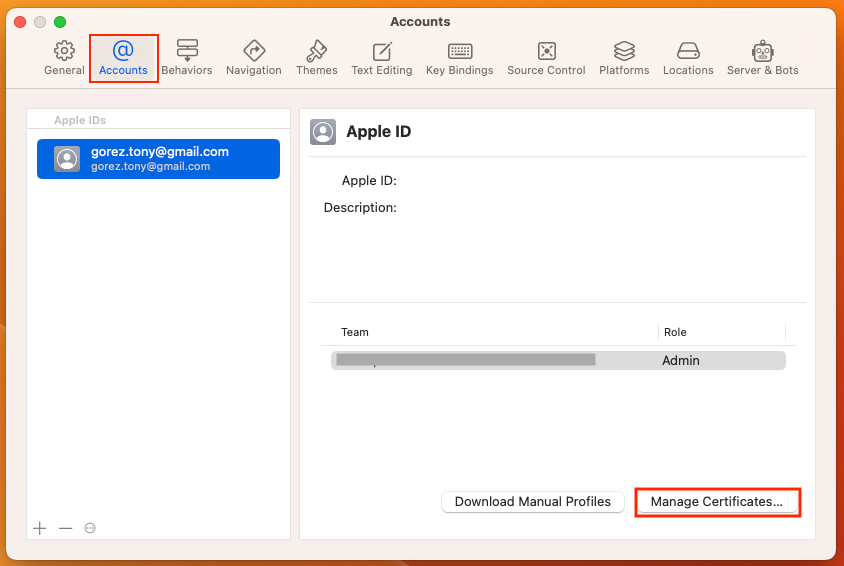 On the "Accounts" tab, click on the "Manage Certificates" button:
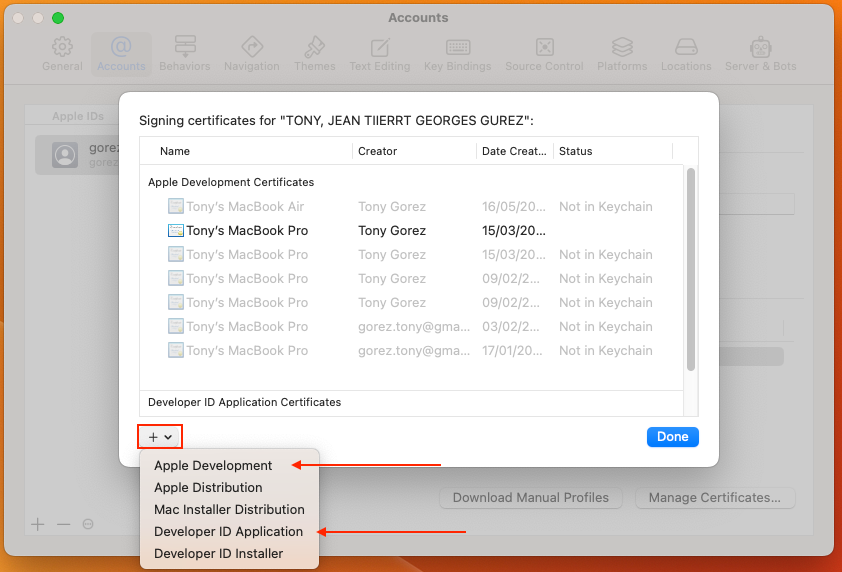 A modal will appear, and from there, you can create either an "Apple Development" or "Developer ID Application" certificate using the "+" button.
Step 1: Set up your project structure
You can clone this project:
GitHub - tony-go/codesign-macos:
And check out the base-build branch, and run:
make
It should finish with the following:
** BUILD SUCCEEDED **

cpack -G DragNDrop -B dist --config ./dist/CPackConfig.cmake -C Release
CPack: Create package using DragNDrop
CPack: Install projects
CPack: - Install project: MyMacOSApp [Release]
CPack: Create package
CPack: - package: /Users/tonygorez/perso/codesign-macos/dist/MyMacOSApp-0.1.1-Darwin.dmg generated.
Step 2: Update the CMakeLists.txt file for code signing
Open the CMakeLists.txt file in your favorite text editor and add the following content:
project(MyMacOSApp LANGUAGES CXX) # after this line, paste this:

set(TEAM_ID "" CACHE STRING "The development team ID for code signing")

if(TEAM_ID STREQUAL "")
    message(FATAL_ERROR "Please set the TEAM_ID variable when generating the project")
endif()
set(CMAKE_MACOSX_BUNDLE YES) # after this line, paste this:

set(XCODE_ATTRIBUTE_CODE_SIGN_STYLE "Manual")
set(XCODE_ATTRIBUTE_DEVELOPMENT_TEAM ${TEAM_ID})
set(XCODE_ATTRIBUTE_CODE_SIGN_IDENTITY "Developer ID Application")
set(XCODE_ATTRIBUTE_CODE_SIGNING_REQUIRED TRUE)
We set all the Xcode attributes required for code-sign The first part of the code allows the user to provide a development team ID (TEAM_ID) for code signing during project generation. If the TEAM_ID variable is not provided, the script will display a fatal error message and halt the generation process.
The script sets up the code signing attributes for the project. Each attribute serves a specific need:
| Attribute | Description |
|---|---|
XCODE_ATTRIBUTE_CODE_SIGN_STYLE | Sets the code signing style (Manual or Automatic). Manual means specifying the signing certificate and provisioning profile manually. |
XCODE_ATTRIBUTE_DEVELOPMENT_TEAM | Specifies the development team's unique identifier (Team ID) associated with your Apple Developer account. |
XCODE_ATTRIBUTE_CODE_SIGN_IDENTITY | Sets the type of signing certificate to use for code signing (e.g., Developer ID Application, iOS Distribution, or Mac App Distribution). |
XCODE_ATTRIBUTE_CODE_SIGNING_REQUIRED | Tells Xcode whether code signing is required for this project. Setting this attribute to TRUE makes code signing mandatory. |
Finally, the set_target_properties function is used to apply the specified code-signing attributes to the target (${APP_NAME}), ensure the application is correctly signed with the provided team ID and the specified signing certificate type during the build process.
add_executable(${APP_NAME} main.m) # after this line, paste this:

set_target_properties(${APP_NAME} PROPERTIES
    XCODE_ATTRIBUTE_CODE_SIGN_STYLE ${XCODE_ATTRIBUTE_CODE_SIGN_STYLE}
    XCODE_ATTRIBUTE_DEVELOPMENT_TEAM ${XCODE_ATTRIBUTE_DEVELOPMENT_TEAM}
    XCODE_ATTRIBUTE_CODE_SIGN_IDENTITY ${XCODE_ATTRIBUTE_CODE_SIGN_IDENTITY}
    XCODE_ATTRIBUTE_CODE_SIGNING_REQUIRED ${XCODE_ATTRIBUTE_CODE_SIGNING_REQUIRED}
)
Step 3: Generate the Xcode project
Now, run the following command to generate the Xcode project, replacing <TEAM-ID> with your actual Apple team ID.
cmake -G Xcode -B dist -DTEAM_ID=<YOUR_ID> -DCMAKE_BUILD_TYPE=$(PRESET)
For example, if your certificate is: Developer ID Application: JOHN, DOE (X4MF6H9XZ6).
You will use the CMake generate command in this way:
cmake -G Xcode -B dist -DTEAM_ID="X4MF6H9XZ6" -DCMAKE_BUILD_TYPE="Release"
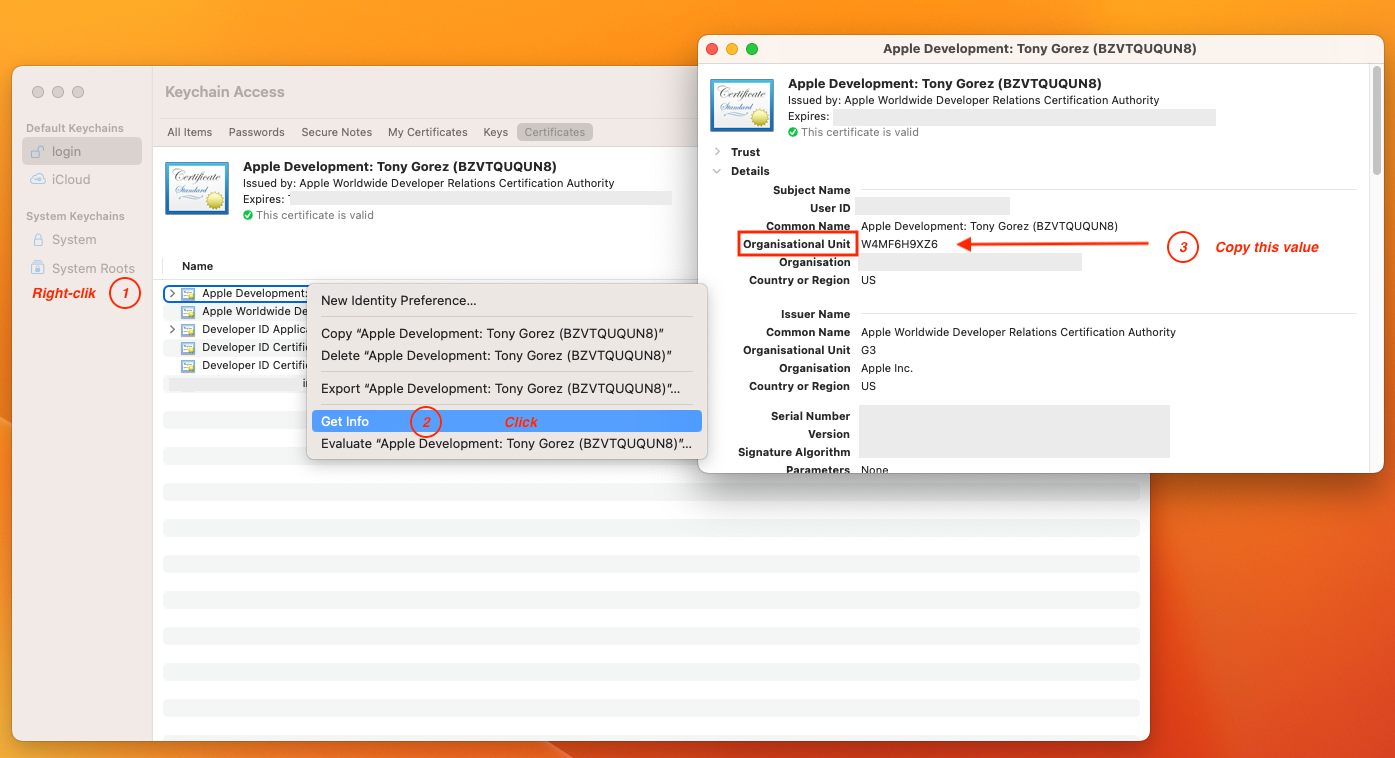
⚠️ If you use an "Apple Development" certificate, You'll have to go to the "Keychain Access" and look at the "Get Info" menu; then, you'll get the "Organisational Unit" that you'll use.
This command should end with:
-- Build files have been written to: <your-path>/codesign-macos/dist
Step 4: Build the application
Run the following command inside the build folder to build the application:
cmake --build dist --config "Release"
This will build and sign the application with your Developer ID Application certificate.
The last line of the output of this command should be:
** BUILD SUCCEEDED **
Step 5: Verify the signature
Run the following command to check if the application is appropriately signed:
codesign --verify --verbose=2 ./Debug/MyMacOSApp
The command should print something like this:
./Release/MyMacOSApp: valid on disk
./Debug/MyMacOSApp: satisfies its Designated Requirement
That's it! You've now built an essential macOS CLI application using CMake and signed it with your Developer ID Application certificate.
If you want, you can package the app and code-sign the .dmg file.
Checkout the codesign-only branch of the repository and take a look at:
make sign-dmgmake verify-dmg
👉All the commands we ran are available in the repository!
Next step
However, it's important to note that code signing alone is not sufficient for meeting the requirements of the Apple App Store. To fully comply with Apple's guidelines, you'll also need to notarize your app, which is an additional layer of security that verifies your software against malware and other potential threats.
In our upcoming blog post, we'll delve into the process of notarizing macOS applications, providing a comprehensive guide on preparing your app for submission to the Apple App Store.