
I recently started my journey with macOS internals. This is probably one of the most exciting topics I learned so far. However, during this journey, I realized that connecting these concepts with the context of desktop applications was hard. Then, I decided to approach it from a practical point of view. For this first series, we will play with launchd.
At the end of this blog post, you will:
- Understand what is launchd?
- Why is it interesting to understand it?
- Start and stop a basic agent with launchd
What is launchd?
Launchd is responsible for starting, stopping, and managing background processes in macOS. Think of it like a manager in a store who decides when the store opens and closes and what tasks need to be done while it's open.
⚠️Launchd capabilities are broader than this, but I simplify it in this first blog post.Why did learning launchd?
Indeed, seeing the interest we could have in something internal like launchd is not initially apparent. But as a developer, you probably already design software that doesn't require any particular user interaction. This is where launchd will shine.
With launchd, your applications can autonomously perform essential tasks, such as a document management app that will silently update search indexes. Consider a photo editing app that uses launchd to scan for new images when the system is idle, ensuring that the user's library is always up to date without impacting system performance during usage.
These background operations orchestrated by launchd enhance the user experience by keeping your applications responsive and ready, showcasing the utility of understanding and utilizing this powerful tool in macOS app development.
💡Or, even simpler, you can execute your shell scripts.Let's start with the basics.
Setup
Instead of diving into many theories, let's create a simple agent.
First, let's create a folder:
mkdir /tmp/learn-launchd

cd /tmp/learn-launchd
Then, create a my_script.sh script:
#!/bin/bash
echo "Script executed!"
echo "Current date and time: $(date)" >> ~/Desktop/date_log.txt
Our agent will run this script for us at regular intervals. Aiming to explain how to launchd how to do so, we need to create a configuration file. This is the time to talk about .plist files.
What is a plist file?
A plist file, which stands for "property list," is used to store user settings and preferences in XML format. In the context of launchd, a .plist file acts as a configuration file for defining and scheduling jobs.
Here's a breakdown of its role for launchd:
- Identification: Each .plist file has a unique label that is used by launchctl to start, stop, or manage the corresponding service.
- Configuration: The plist file specifies what command or application launchd should run and what conditions it should restart if it stops or crashes.
- Scheduling: You can set it up to run at certain intervals, at a specific time, upon certain events, or keep a service running constantly.
- Control: It allows you to control the environment in which a service runs by setting environment variables or standard input/output paths (stdout and stderr), for instance.
When you create a .plist file for launchd, you're essentially creating a set of instructions in a format that launchd understands and can act upon.
Create a launchd configuration file
The configuration file name should be the unique Label. For instance, for our agent, we will use: com.example.myagent.plist.
We should save this file under ~/Library/LaunchAgents/ folder that contains all agent's configurations:
<?xml version="1.0" encoding="UTF-8"?>
<!DOCTYPE plist PUBLIC "-//Apple//DTD PLIST 1.0//EN" "http://www.apple.com/DTDs/PropertyList-1.0.dtd">
<plist version="1.0">
<dict>
    <key>Label</key>
    <string>com.example.myagent</string>
    <key>ProgramArguments</key>
    <array>
        <string>/Users/tonygorez/learn/macos-internals/launchd/my_script.sh</string>
    </array>
    <key>StartInterval</key>
    <integer>60</integer>
    <key>RunAtLoad</key>
    <true/>
    <key>StandardOutPath</key>
    <string>/tmp/learn-launchd/output/myagent.out</string>
    <key>StandardErrorPath</key>
    <string>/tmp/learn-launchd/output/myagent.err</string>
</dict>
</plist>
Let's break down the properties we used:
- Label is a unique identifier for your agent.
- ProgramArguments is an array containing the command to run your script.
- StartInterval is set to 60, meaning your script will run every minute.
- RunAtLoad set to
truemeans the script will also run when the agent is first loaded. - The StandardOutPath and StandardErrorPath are where the standard output and error will be logged.
Start the agent
We start the agent with the launchctl command:
launchctl load ~/Library/LaunchAgents/com.example.myagent.plist
🎉 Tada!
This tells launchd to load the agent configuration from the .plist file you created, which will start your script immediately because the RunAtLoad key is set to true. It will also schedule it to run every minute, as the StartInterval specifies.
Verify that the agent works
With the list command
To verify that your agent is loaded, you can list all the agents with:
launchctl list | grep com.example.myagent
You should see an entry com.example.myagent in the output:
- 0 com.example.myagent
That indicates that our agent is loaded and has been assigned the label com.example.myagent. The first column with the dash (-) signifies that no specific process identifier is currently associated with the agent. This is typical for agents that are not constantly running but are scheduled to run at intervals or in response to specific events.
The second column with the zero (0) indicates that the last exit status of the agent was successful (an exit code of 0 typically means success in Unix-like systems).
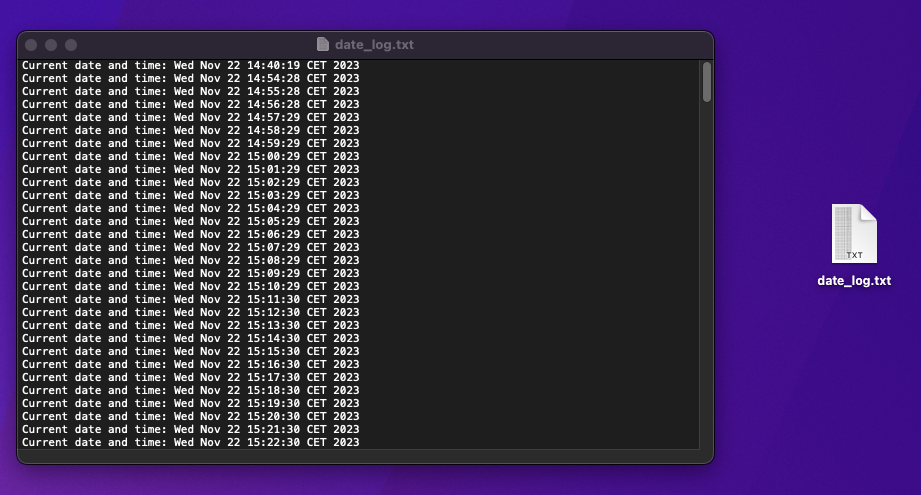
With the date_log.txt file
This is probably the one you thought first. If you recall correctly, the script was producing a date_log.txt file that should contain dates:
Finally, if you want to see the output of your script to ensure it's running correctly, you can check the log files you specified in the .plist configuration.
cat /tmp/learn-launchd/output/myagent.out
You should see something like:
Script executed!
Script executed!
Script executed!
Script executed!
Script executed!
Script executed!
Script executed!
Script executed!
Stop the agent
At some point, you would like to stop the execution of this agent. This is possible with:
launchctl unload ~/Library/LaunchAgents/com.example.myagent.plist
Now, if you run the list command again:
launchctl list | grep com.example.myagent
Nothing will be printed in the console. Your agent is not running anymore.
Next?
In the next post of this series, we will explore more about launchd capabilities. Subscribe to the newsletter to receive an alert when I'll publish the next post.